
Have you ever wanted to create your own video game… for your keychain? The KeyChainino is a mini but powerful 12×12 LED matrix gaming platform powered by an ATmega328 microcontroller and a clever technique called Charlieplexing.
This tutorial will walk you through everything you need to create your own games:
- What is Charlieplexing?
- How to install the KeyChainino library
- What each library function does and when to use it
- How to write a simple game: Dodge the Falling Dot
- How sleep mode works and how to use it
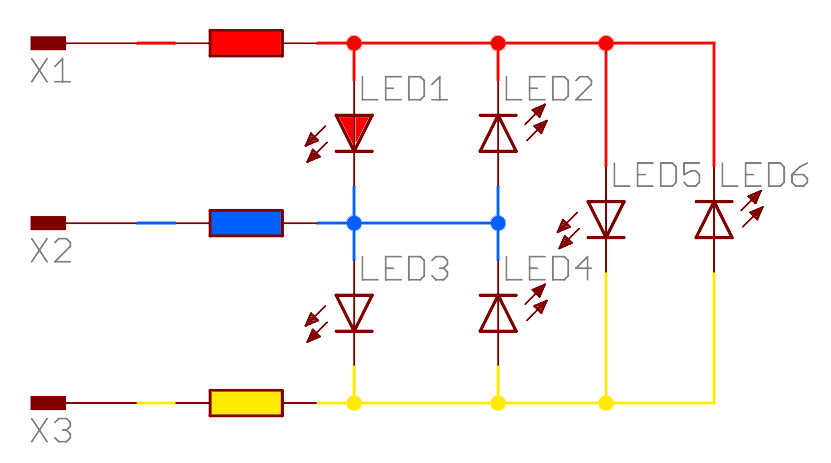
What is Charlieplexing?
Charlieplexing is a clever way to control lots of LEDs with very few microcontroller pins. Instead of using one pin per LED, you can control n × (n - 1) LEDs with only n pins. For example, with 13 pins (used in the KeyChainino), you can control 156 LEDs — more than enough for a 12×12 matrix (144 LEDs).
Only one LED is turned on at a time, but this switching happens so fast that it looks like many LEDs are on at once. It’s all handled for you in the library!
How to Install the KeyChainino Library
To use the KeyChainino functions in your sketches, you first need to install the library manually. Here’s how:
-
Download the library files (you should have a folder named
KeyChaininocontainingKeyChainino.h,KeyChainino.cpp, andLED_Font_1.h). -
Move that folder into your Arduino libraries folder, typically:
- On Windows:
Documents/Arduino/libraries - On macOS:
~/Documents/Arduino/libraries
- On Windows:
- Restart the Arduino IDE. The library will now be available under Sketch > Include Library.
Library Functions: What They Do and When to Use Them
Once the library is installed, you can use it in your sketch like this:
#include <KeyChainino.h>The global object KC (short for KeyChainino) gives you access to everything.
Initialization
KC.init();Call this once in setup() to initialize the LED matrix and prepare the display.
Displaying and Clearing
KC.display();   // Update the LED matrix with current pixel data
KC.clear();     // Turn off all LEDs (doesn't update screen yet)
KC.full();      // Turn on all LEDs (great for testing)
Tip: Always call KC.display() after drawing changes to actually show them.
Drawing Pixels and Shapes
KC.pixel(x, y, ON);   // Turn ON pixel at (x, y)
KC.pixel(x, y, OFF);  // Turn it OFF

KC.line(x0, y0, x1, y1);           // Draw a line
KC.rect(x, y, width, height);     // Draw rectangle border
KC.rectFill(x, y, width, height); // Draw filled rectangle
KC.circle(x, y, r);               // Draw a circle
KC.circleFill(x, y, r);           // Draw filled circle
Use these functions to create game elements — players, enemies, walls, etc.
Text Scrolling
KC.scrollText("Hello!");   // Scroll text forever
KC.scrollText("Game Over!", 2, true);  // Scroll 2 times and block execution until done
Sleep Mode
KC.goSleep();This puts the KeyChainino into deep sleep to save battery. It shuts down unused peripherals and turns off the screen. You can wake it up by pressing both Button A and Button B at the same time.
Important: Sleep mode only exits when both buttons are pressed simultaneously. If only one is pressed, it will stay in sleep to prevent accidental wakeups in your pocket.
Let’s Build a Game: Dodge the Falling Dot
Scope of the Game: This game is a reflex-based single-player game where you control a small player block at the bottom of the 12×12 LED matrix. From the top, a single dot (the “obstacle”) falls straight down in a random column. Your goal is to avoid getting hit by that dot!
You can move left or right using the KeyChainino’s buttons:
- Button A (Left): Moves the player one column left
- Button B (Right): Moves the player one column right
The dot moves down one row every 200 milliseconds. When it reaches the bottom row (y = 11), the game checks if it’s in the same column as the player. If so, it’s Game Over! If not, the dot resets to the top at a new random position and the game continues.
This is a simple game designed to demonstrate:
- Drawing pixels with the
KC.pixel()function - Updating the screen with
KC.display() - Reading button inputs with
digitalRead() - Handling game state with basic logic
It’s perfect as your first game — and a fun base to build more advanced mechanics!
Step 1: Start the Sketch
#include <KeyChainino.h>

void setup() {
  KC.init();
}
Step 2: Create Game Variables
int playerX = 6;
int dotX = random(0, 12);
int dotY = 0;
bool gameOver = false;
Step 3: Game Loop
void loop() {
  if (gameOver) {
    KC.clear();
    KC.scrollText("Game Over!", 2, true);
    KC.goSleep();  // Enter low power sleep mode
    // After waking up from sleep (pressing both buttons), reset game
    playerX = 6;
    dotX = random(0, 12);
    dotY = 0;
    gameOver = false;
  }

  KC.clear();

  dotY++;
  if (dotY > 11) {
    dotY = 0;
    dotX = random(0, 12);
  }

  KC.pixel(dotX, dotY, ON);
  KC.pixel(playerX, 11, ON);

  if (dotY == 11 && dotX == playerX) {
    gameOver = true;
  }

  KC.display();

  if (digitalRead(BUTTON_A) == LOW && playerX > 0) {
    playerX--;
  }
  if (digitalRead(BUTTON_B) == LOW && playerX < 11) {
    playerX++;
  }

  delay(200);
}
What Next?
You can build on this game by adding:
- Increasing speed each level
- A score system
- Multiple falling dots
Or try building another game like Snake, Tetris, or a scrolling text-based quiz!
Have questions or want to share your creation? Drop a comment or tag us on social media — we’d love to see what you’re making!


